Brittany Meets Em Scarf
It's Brittany, finally posting again!
Scarves can be so tedious. I normally become bored with them and they end up half done in the bottom of my works in progress bag. This scarf was much different than that. I enjoyed making this scarf from start to finish. The chart was pretty easy to read, but had just enough change to keep me wanting to work on it.
I started this project back in December when I found a beautiful Cascade 220 Quatro yarn at my LYS. I loved the color and thought it would be the perfect color for this scarf. I went home and started knitting. As time went by I slowed down on my progress due to other projects and lack of time. When I picked the project up again I realized I was going to run out of yarn and the scarf was not going to be long enough. To solve this problem, I headed back to my LYS to get the same color. Unfortunately, they were out of that color and I REALLY was inspired to continue working on my Wave Scarf as soon as possible. So, I settled for a different color of the Cascade 220 Quatro yarn. I was a bit nervous about it, but picked a color I thought would really complement the color I had already chose and figured I would make it half and half. I was very nervous because I didn't want to spend a lot of time on something that I would end up disliking and frogging. However, I continued working on my scarf. A couple weekends ago I ran out of the dark blue, purple, and green quatro and added on the turquoise, brown, and light blue yarn. I continued progress on this project and then set it aside.
Last Friday, I was working on it at our Friday Night Knitting Club and Em commented on how much she liked the colors together. We discussed how it kind of looked like colors I really like and colors she really likes. That led to the Wave Scarf being renamed the Brittany Meets Em Scarf. It makes sense because she really likes browns and blues and I really like cool colors like blue, purple and green. The perfect scarf to represent our personalities.
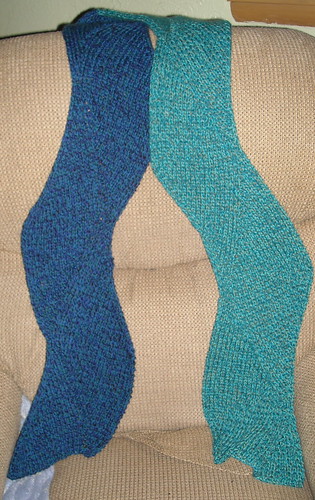
The pattern itself is nothing super complicated but I definitely encourage you to make this scarf. It is fun and each row is slightly different from the last. One error in the pattern which you can find on the errata page is you should skip row 1 of the chart every repeat. The errata page says to skip rows 1-4, but I only skipped row 1 and it worked for me.
My only caution is to keep track of where you are in the pattern when you put it away. I often forgot where I was in the pattern and would end up having to take out a few rows every time I restarted. Also notice that the M on the chart stands for Make 2. At first I kept losing stitches and I could not figure out what I was doing wrong until I realized I was only making one stitch instead of 2.
Yarn Information: Cascade 220 Quatro #1957 (Antigua) & Cascade 220 Quatro #5022 (Oceanside)
Well, as always, I hope you enjoyed my post about this pattern. Do not hesitate to comment if you have any questions about this pattern, or if there is another pattern we have not yet completed that you are looking for help with. We will do our best to answer any questions you have. We may be working on the project you need help with, but just haven't had the chance to post about it yet.
If you would like to see more pictures of this project and other projects completed by me, check out my Flickr Account.
Thanks for reading,
Brittany
Sunday, March 27, 2011
Sunday, March 20, 2011
March 20 Progress Update!
It has been a while since our last progress update, but we have finally gotten around to it. As normal you will see an update of how many projects we have completed, started, or are still waiting to be started. If a project is still waiting it may have a name next to it. Some may not because a few of them we are going to decide on later. As in previous update posts if the project name is colored pink it is in progress by Brittany and if colored green it is in progress by Em. If the project name is colored and crossed out that means it is completed. We will also have Pattern Entries linked next to each project as we update the blog with our evaluations and input on each pattern.
As of March 20, 2011:
20/60 Projects - Completed
16/60 Projects - Works In Progess
24/60 Projects - Waiting to be Started
Pattern #1 Chain-Link Scarf (Brittany)
Pattern #2 Cable Brim Tam (Brittany)
Pattern #3 Waffle Mittens
Pattern #4 Puppy Mittens
Pattern #5 Tweed Watch Cap - Project Entry
Pattern #6 Tied Rectangle Wrap
Pattern #7 Embroidered Mittens
Pattern #8 Lion Scarf
Pattern #9 Monkey Hat (Em)
Pattern #10 Diagonal Stripes Hat (Brittany)
Pattern #11 Wave Scarf
Pattern #12 Cables & Wraps Scarf
Pattern #13 Ribbed Wristers - In Progress Project Entry
Pattern #14 Zigzag Scarf (Em)
Pattern #15 Striped Bobbled Hat (Brittany)
Pattern #16 Ribbed Bonnet (Em)
Pattern #17 Plaid Mittens
Pattern #18 Striped Graduated Scarf
Pattern #19 Twisted Toque
Pattern #20 Textured Triple-Stripe Scarf
Pattern #21 Birdcage Mittens
Pattern #22 Bobbles & Cables Cap - Project Entry
Pattern #23 Smocked Fingerless Mitts - Project Entry
Pattern #24 Mittered Scarf
Pattern #25 Ribbed Keyhole Scarf
Pattern #26 Basketweave Scarf - Project Entry
Pattern #27 Scalloped-Edge Beanie - Project Entry
Pattern #28 Reverse Stockinette Mittens
Pattern #29 Cupcake Hat (Brittany)
Pattern #30 Eyelet Scarf
Pattern #31 Garter-Ridged Hat
Pattern #32 Garter-Stitch Neck Wrap
Pattern #33 Pocket Cap
Pattern #34 Checkered Mittens - Project Entry
Pattern #35 Textured Tam (Em)
Pattern #36 Leaf Scarf (Em)
Pattern #37 Mock Cable Wristers - In Progress Project Entry, Completed Project Entry
Pattern #38 Garter-Ridged Scarf
Pattern #39 Cables & Stripes Mittens - Project Entry
Pattern #40 Tweed Mittens - Project Entry
Pattern #41 Pocket Scarf
Pattern #42 Ribbed Pillbox
Pattern #43 Octopus Mittens (Brittany)
Pattern #44 Tasseled Topper (Brittany)
Pattern #45 Bunny Mittens - Project Entry
Pattern #46 Leaf-Lace Gauntlets (Em)
Pattern #47 Striped & Ruffled Wrap
Pattern #48 Starfish Hat - Project Entry
Pattern #49 Slip-Stitched Hat - Project Entry
Pattern #50 Ruffled Scarf (Brittany)
Pattern #51 Cabled-Cuff Mittens (Em)
Pattern #52 Cabled Scarf Hat - In Progress Project Entry
Pattern #53 Two-Color Slip-Stitched Hat - Project Entry
Pattern #54 Twisted-Rib Hat (Em)
Pattern #55 Triple-Cable Scarf
Pattern #56 Flip-Top Mittens
Pattern #57 Drop-Stitch Neck Wrap
Pattern #58 Spotted Fair Isle Mittens
Pattern #59 Hugs & Kisses Mittens
Pattern #60 Scandinavian Mittens
More information to come soon!
As of March 20, 2011:
20/60 Projects - Completed
16/60 Projects - Works In Progess
24/60 Projects - Waiting to be Started
Pattern #1 Chain-Link Scarf (Brittany)
Pattern #2 Cable Brim Tam (Brittany)
Pattern #6 Tied Rectangle Wrap
Pattern #8 Lion Scarf
Pattern #9 Monkey Hat (Em)
Pattern #10 Diagonal Stripes Hat (Brittany)
Pattern #11 Wave Scarf
Pattern #12 Cables & Wraps Scarf
Pattern #13 Ribbed Wristers - In Progress Project Entry
Pattern #14 Zigzag Scarf (Em)
Pattern #15 Striped Bobbled Hat (Brittany)
Pattern #16 Ribbed Bonnet (Em)
Pattern #17 Plaid Mittens
Pattern #18 Striped Graduated Scarf
Pattern #20 Textured Triple-Stripe Scarf
Pattern #21 Birdcage Mittens
Pattern #24 Mittered Scarf
Pattern #25 Ribbed Keyhole Scarf
Pattern #28 Reverse Stockinette Mittens
Pattern #29 Cupcake Hat (Brittany)
Pattern #30 Eyelet Scarf
Pattern #31 Garter-Ridged Hat
Pattern #32 Garter-Stitch Neck Wrap
Pattern #33 Pocket Cap
Pattern #35 Textured Tam (Em)
Pattern #36 Leaf Scarf (Em)
Pattern #42 Ribbed Pillbox
Pattern #43 Octopus Mittens (Brittany)
Pattern #44 Tasseled Topper (Brittany)
Pattern #46 Leaf-Lace Gauntlets (Em)
Pattern #47 Striped & Ruffled Wrap
Pattern #50 Ruffled Scarf (Brittany)
Pattern #51 Cabled-Cuff Mittens (Em)
Pattern #52 Cabled Scarf Hat - In Progress Project Entry
Pattern #54 Twisted-Rib Hat (Em)
Pattern #55 Triple-Cable Scarf
Pattern #57 Drop-Stitch Neck Wrap
Pattern #58 Spotted Fair Isle Mittens
Pattern #59 Hugs & Kisses Mittens
Pattern #60 Scandinavian Mittens
More information to come soon!
Thursday, March 17, 2011
Pattern #26 Basketweave Scarf
Hey all, it's Em!
It's spring break over here in Green Bay, WI. Both Brittany and I have been enjoying the nice sunshine here!!! Because it is so nice outside, our knitting has been taking a slight backseat. However, we can promise you that we will be back to knitting as soon as we are settled into this nice warm weather:) (Or it snows again...)
Here we are...enjoying the first "true" week of spring by shopping! (No we didn't get the bling-bling sunglasses...)
I just completed the Basketweave Scarf! I used Creative Focus Nashua Worsted Yarn. I love Nashua because they have such pretty colors. I love the feeling of the yarn in my hands. However, since the yarn splits, it was very hard to knit with this pattern.
I started with a size 7 needle. I was having issues knitting with this smal of a needle. In result, I bumped up to a size 9. I had a lot more luck knitting with a size nine needle. Why? I think it was because of the stitch. With this pattern, one does a lot of stitch twisting. For me, it is easier to do stitch twisting with a larger needle. My hands tend to hurt if it is too small of a needle. Since this yarn tends to split easier than other yarns, it was crucial for me to have the most comfortable yarn and needle combo I could come up with.
I discovered about 1/2 way through the pattern that I needed 2 skeins of Cascade 220 yarn to make this scarf. Nashua Creative Focus has 220 yards on a skein...but I didn't have the correct color to match up with it. Instead of hunting for another skein of this yarn, I decided to make this yarn a scarflet.
I really liked this pattern. It was simple but yet eye appealing. I would advise using Cascade 220 yarn. Cascade rarely splits which will make the knitting process easier.
I will be blocking this scarf soon! I believe that blocking the scarf will give it length and make the edges smoother.
That's all I have for now!
E
It's spring break over here in Green Bay, WI. Both Brittany and I have been enjoying the nice sunshine here!!! Because it is so nice outside, our knitting has been taking a slight backseat. However, we can promise you that we will be back to knitting as soon as we are settled into this nice warm weather:) (Or it snows again...)
Here we are...enjoying the first "true" week of spring by shopping! (No we didn't get the bling-bling sunglasses...)
I just completed the Basketweave Scarf! I used Creative Focus Nashua Worsted Yarn. I love Nashua because they have such pretty colors. I love the feeling of the yarn in my hands. However, since the yarn splits, it was very hard to knit with this pattern.
I started with a size 7 needle. I was having issues knitting with this smal of a needle. In result, I bumped up to a size 9. I had a lot more luck knitting with a size nine needle. Why? I think it was because of the stitch. With this pattern, one does a lot of stitch twisting. For me, it is easier to do stitch twisting with a larger needle. My hands tend to hurt if it is too small of a needle. Since this yarn tends to split easier than other yarns, it was crucial for me to have the most comfortable yarn and needle combo I could come up with.
I discovered about 1/2 way through the pattern that I needed 2 skeins of Cascade 220 yarn to make this scarf. Nashua Creative Focus has 220 yards on a skein...but I didn't have the correct color to match up with it. Instead of hunting for another skein of this yarn, I decided to make this yarn a scarflet.
I really liked this pattern. It was simple but yet eye appealing. I would advise using Cascade 220 yarn. Cascade rarely splits which will make the knitting process easier.
I will be blocking this scarf soon! I believe that blocking the scarf will give it length and make the edges smoother.
That's all I have for now!
E
Thursday, March 10, 2011
Pattern #52 Cabled Scarf Hat
Hey It's Em!
I'm working on the Cabled Scarf Hat right now. I am using Berant Alpaca Yarn and Patron's Wool for this project. (It wasn't my idea! I'd use 220 but I needed a thicker Alpaca Yarn that was within my tiny tiny tiny yarn budget!) At first I was a little worried about starting this project. To me, it looked a little strange to have a scarf attached to a hat. It also looked hard. I'm not good at following cabled charts. Well, when my co-worker Cathie wanted me to make one for her, I figured I could try to keep an open mind and try something new.
I really like this pattern because it is a great cabled pattern to work with. If you are learning how to use a chart, it is a great beginner project to do. I recommend using a post-it note to track your progress. This way you can move it while seeing the work you did in the previous row as seen below.
(I purposely kept the rows hidden from the camera because I fear that somebody will interpret this photo as me giving away part of the pattern. The intention is to show how the post-it note works with a cabled chart.)
It is a quick knit. I did one tail of the scarf in a weekend. The pattern is simplistic. The bobbles were also very easy. It is one of those patterns where you have to do what it says and you won't know how it works out until you finish your first one. Now, after doing a few bobbles, it makes a lot more sense. I recommend using a sharper needle to do the bobbles. I had a hard time preventing my yarn from splitting when I had to P3 tog.
I will be blocking this scarf, which I am looking forward to doing with one of my good friends. (If she's willing to help me!)
Connecting the scarf to the hat was frustrating for me. First of all, the pattern requires you to CO 44 stitches, k 2 rows and then put these stitches on a holder. Then, repeat. Then use a circular needle to add all the things together.
I decided to do this in one step.
This is how I did it.
CO44 Stitches, place one scarf onto the circular needle, knit/purl stitches as they come, CO44 more stitches, place the second scarf onto the circular needle. Knit/Purl stitches as they come, place marker and join round.
P44, knit/purl stitches as they are for the cabled scarf section,
P44, knit/purl stitches as they are for cabled scarf, sl
K44, row 1 of scarf pattern, K44, row 1 of scarf
and so forth.
I had to change the needle size for my hat too. I used a size 7 but the hat was becoming too large. I ripped out the hat and started again on a size 6. This time, it works a lot better.
I am still working on the scarf pattern. I will be writing another blog entry about the hat once the hat section is complete. However, I know there are people out there that are wondering how the scarf part of the pattern works.
This pattern has a few downfalls. First of all, it is too short. The scarf part that is. All of the people who made this scarf on Ravelry, made the scarf part of the pattern longer. I hypothesize with the popularity of long scarves today, it is possible people just want longer scarves. For me, the original 3 pattern repeat did not work as a scarf. Instead it worked as long ties. I did a four pattern repeat and the scarf works for Cathie. (I would have done one more repeat.)
Over all, I am enjoying the adventure I am having with this scarf!
Happy Knitting!
E
Monday, March 7, 2011
March 7 Progress Update
Below is our update on how many projects we have completed, started, or are still waiting. If a project is still waiting it may have a name next to it. Some may not because a few of them we are going to decide on later. As in previous update posts if the project name is colored pink it is in progress by Brittany and if colored green it is in progress by Em. If the project name is colored and crossed out that means it is completed. We will also have Pattern Entries linked next to each project as we update the blog with our evaluations and input on each pattern.
As of March 7, 2011:
20/60 Projects - Completed
12/60 Projects - Works In Progess
28/60 Projects - Waiting to be Started
Pattern #1 Chain-Link Scarf (Brittany)
Pattern #2 Cable Brim Tam (Brittany)
Pattern #3 Waffle Mittens
Pattern #4 Puppy Mittens
Pattern #5 Tweed Watch Cap - Project Entry
Pattern #6 Tied Rectangle Wrap
Pattern #7 Embroidered Mittens
Pattern #8 Lion Scarf
Pattern #9 Monkey Hat (Em)
Pattern #10 Diagonal Stripes Hat (Brittany)
Pattern #11 Wave Scarf
Pattern #12 Cables & Wraps Scarf
Pattern #13 Ribbed Wristers - In Progress Project Entry
Pattern #14 Zigzag Scarf (Em)
Pattern #15 Striped Bobbled Hat (Brittany)
Pattern #16 Ribbed Bonnet (Em)
Pattern #17 Plaid Mittens
Pattern #18 Striped Graduated Scarf (Em)
Pattern #19 Twisted Toque
Pattern #20 Textured Triple-Stripe Scarf
Pattern #21 Birdcage Mittens (Brittany)
Pattern #22 Bobbles & Cables Cap - Pattern Entry
Pattern #23 Smocked Fingerless Mitts - Project Entry
Pattern #24 Mittered Scarf
Pattern #25 Ribbed Keyhole Scarf
Pattern #26 Basketweave Scarf
Pattern #27 Scalloped-Edge Beanie - Project Entry
Pattern #28 Reverse Stockinette Mittens
Pattern #29 Cupcake Hat (Brittany)
Pattern #30 Eyelet Scarf
Pattern #31 Garter-Ridged Hat
Pattern #32 Garter-Stitch Neck Wrap
Pattern #33 Pocket Cap
Pattern #34 Checkered Mittens - Project Entry
Pattern #35 Textured Tam (Em)
Pattern #36 Leaf Scarf (Em)
Pattern #37 Mock Cable Wristers - In Progress Project Entry, Completed Project Entry
Pattern #38 Garter-Ridged Scarf
Pattern #39 Cables & Stripes Mittens - Pattern Entry
Pattern #40 Tweed Mittens - Project Entry
Pattern #41 Pocket Scarf
Pattern #42 Ribbed Pillbox (Brittany)
Pattern #43 Octopus Mittens (Brittany)
Pattern #44 Tasseled Topper (Brittany)
Pattern #45 Bunny Mittens - Project Entry
Pattern #46 Leaf-Lace Gauntlets (Em)
Pattern #47 Striped & Ruffled Wrap
Pattern #48 Starfish Hat - Pattern Entry
Pattern #49 Slip-Stitched Hat - Pattern Entry
Pattern #50 Ruffled Scarf (Brittany)
Pattern #51 Cabled-Cuff Mittens (Em)
Pattern #52 Cabled Scarf Hat
Pattern #53 Two-Color Slip-Stitched Hat - Project Entry
Pattern #54 Twisted-Rib Hat (Em)
Pattern #55 Triple-Cable Scarf
Pattern #56 Flip-Top Mittens
Pattern #57 Drop-Stitch Neck Wrap
Pattern #58 Spotted Fair Isle Mittens
Pattern #59 Hugs & Kisses Mittens
Pattern #60 Scandinavian Mittens
More information to come soon!
As of March 7, 2011:
20/60 Projects - Completed
12/60 Projects - Works In Progess
28/60 Projects - Waiting to be Started
Pattern #1 Chain-Link Scarf (Brittany)
Pattern #2 Cable Brim Tam (Brittany)
Pattern #6 Tied Rectangle Wrap
Pattern #8 Lion Scarf
Pattern #9 Monkey Hat (Em)
Pattern #10 Diagonal Stripes Hat (Brittany)
Pattern #11 Wave Scarf
Pattern #12 Cables & Wraps Scarf
Pattern #13 Ribbed Wristers - In Progress Project Entry
Pattern #14 Zigzag Scarf (Em)
Pattern #15 Striped Bobbled Hat (Brittany)
Pattern #16 Ribbed Bonnet (Em)
Pattern #17 Plaid Mittens
Pattern #18 Striped Graduated Scarf (Em)
Pattern #20 Textured Triple-Stripe Scarf
Pattern #21 Birdcage Mittens (Brittany)
Pattern #24 Mittered Scarf
Pattern #25 Ribbed Keyhole Scarf
Pattern #28 Reverse Stockinette Mittens
Pattern #29 Cupcake Hat (Brittany)
Pattern #30 Eyelet Scarf
Pattern #31 Garter-Ridged Hat
Pattern #32 Garter-Stitch Neck Wrap
Pattern #33 Pocket Cap
Pattern #35 Textured Tam (Em)
Pattern #36 Leaf Scarf (Em)
Pattern #42 Ribbed Pillbox (Brittany)
Pattern #43 Octopus Mittens (Brittany)
Pattern #44 Tasseled Topper (Brittany)
Pattern #46 Leaf-Lace Gauntlets (Em)
Pattern #47 Striped & Ruffled Wrap
Pattern #50 Ruffled Scarf (Brittany)
Pattern #51 Cabled-Cuff Mittens (Em)
Pattern #52 Cabled Scarf Hat
Pattern #54 Twisted-Rib Hat (Em)
Pattern #55 Triple-Cable Scarf
Pattern #57 Drop-Stitch Neck Wrap
Pattern #58 Spotted Fair Isle Mittens
Pattern #59 Hugs & Kisses Mittens
Pattern #60 Scandinavian Mittens
More information to come soon!
Saturday, March 5, 2011
Pattern #53 Two-Color Slip-Stitched Hat
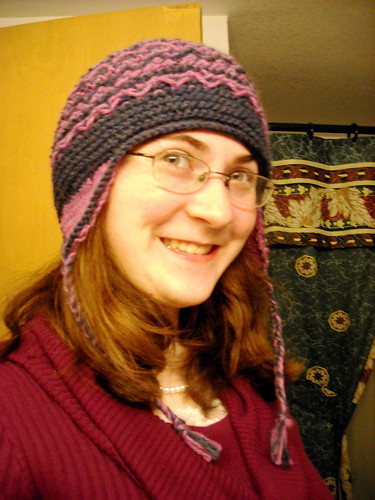
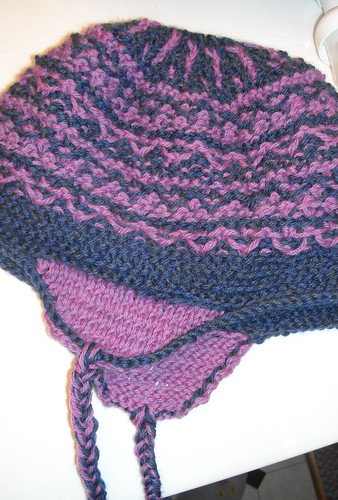
Hey everyone, it is Brittany again. Today I am sharing pattern #53 the two-color slip-stitched hat. I decided to make this hat after my mom complained that my bobbles and cables hat was for me. She wanted a hat to wear to go up the rather large hill that connects our house to her workplace. I had already made my mom the Pattern #34 Checkered Mittens so I needed to make a hat to kind of match that. I found left over yarn from two previous projects and started to work on it. I really liked the way it was knitting up and spent all of Wednesday night knitting on it. Thursday night I was finishing up on the hat when I noticed something... I had knit the entire thing on circular needles when the pattern was meant for straight needles. I contemplated frogging the hat and starting over but my mom really liked it and did not want me to start all over. I left the hat the way it was, but it was a lesson for me about the importance of really reading through a pattern before you start. I also hope it is helpful to all of you so you do not make the same mistake!
Anyway, I still like the way it turned out, the colors together are really pretty. My mom was a bit worried it would fall off her head because the brim was rather loose. She thought that she would also like some ear flaps, which would solve the problem. I added some earflaps, which I actually really like. I think it kind of adds something to the uniqueness of the hat. If you would like to add earflaps to yours here is what I did:
Holding the back of the hat find the seam.
Approximately 8-10 stitches to the right of the seam pick up 20 sts
Using color B, K20 sts then turn
P20 sts turn
Ssk, K16, K2tog turn
P18 turn
Ssk, K14, K2tog turn
P16 turn
Ssk, K12, K2tog turn
P14 turn
Ssk, K10, K2tog turn
P12 turn
Ssk, K8, K2tog turn
P10 turn
Bind Off 10 st
Repeat the process by starting the second earflap 8-10 stitches to the left of the seam.
After finishing both earflaps I then picked up all the stitches starting from the seam over the earflaps and back to the back. I finished by binding all stitches off in a knit stitch.
Then cutting 12 strands of yarn approximately 24" in length (6 color A, 6 color B) I pulled 6 strands through each earflap (3 of each color). Half of each strand was on each side of the earflap. I then braided the yarn using two strands from the front side and two strands from the back side for each of the three braid strands. This helps to keep them on the ear flap. You can kind of mix and match the strands or put some together how ever you like.
You can see the results for yourself:
If I were to redo this hat (which I may do after some of my other 60 Quick Knits projects are done), I would of course follow the pattern more correctly. I think I would still do the project on circulars because it is less of a hassle. I do not particularly like the idea of sewing the seam of a hat because I do not know that it would be as sturdy. However, I could get away with doing the pattern on circulars as long as every WS row (even rows) was reversed. For example, if it says to purl row 6 you would knit that row instead. I also would suggest going down a needle size or even two on the initial cast on. This would make the brim a little tighter on the head.
Yarn Information: Cascade 220 Heather - #2419 (Aster) and Cascade 220 Heather - #2424 (Summer Night)
I hope you enjoyed reading about this hat and I hope it helps you. If you would like to see more pictures of this project and my other 60 Quick Knit projects check out my Flickr Account.
Brittany
Subscribe to:
Posts (Atom)