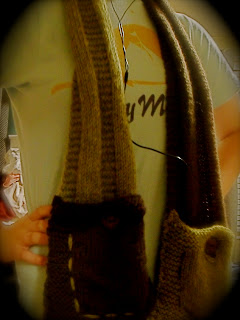
To make it easy to find the pattern you are looking for click on a picture below to go to the project details. We only have the projects that are currently completed, but we will add more and eventually have all of them here for you to navigate through.

Pattern #1 - Chain Link Scarf

Pattern #29 - Cupcake Hat


Monday, December 26, 2011

Pattern #1 Chain-Link Scarf

DSCN1901

Hello everyone, it is Brittany! I finally have a break from concert preparations (I had four concerts this December) and can take some time to relax. On some of my time off I would like to share some of my recent knitting projects.

Today, I am going to talk about the chain-link scarf. This scarf is rather simple and fun to make. One thing I really like about this pattern is that it is made by width instead of height. For some reason I feel like scarves like this go much faster. I am not sure why, but it just works well.

DSCN1896

This pattern is very simple and the scarf knits up quickly. I would agree that this is a quick knit, however, you have to make it thiner than the pattern calls for. I do NOT like super thick scarves. They just fit awkwardly and they take too long to knit. Instead of making this 7 chain-links wide I made it just 3 chain-links wide. As you can see in the picture below it fits nicely and is still wide enough to cover your neck. (I have a rather long neck and you can see it covers mine.)

Pattern #1 Chain Link Scarf

I did not find any mistakes in this pattern and I would recommend it to anyone.

Yarn Choice: Cascade 220 Paints - #9847 (Montego Bay), Cascade 220 - #8909 (Raspberry)

As always you can see more pictures of this project and other projects at my flickr account. Have a great day!

Brittany

Wednesday, December 14, 2011

Pattern #56 Flip Top Mittens

Hello Everybody It is Em!

As the days before Christmas keep on getting smaller, we are currently knitting our fingers off!  Brittany just finished two scarves (and they look so cool!) Stay tuned for her blog entries about these fab scarves!

Our goal for us to knit 5 patterns before New Years is going along well.  I am almost done with the Lion Scarf, I'm also making the twisted rib hat (for an Xmas Gift, so it will be finished by the 25th) and Brittany has one more project to make.  We promise we are working very hard to achieve our goal!  For now, we are trying to write about some of our projects that we finished before we started our blog.  One of those projects is the Flip Top Mittens.


I really did not care for this pattern.  I have a different pattern that I use for flip-top mittens that I absolutely love!  I have made that pattern quite a few times and I never had any issues with them.

When I started this pattern, I was very shocked to see that the wrist pattern was not a normal rib pattern.  I was too much in love with ribbing to try this pattern.  However, many people on Rav stated that this was their favorite part! So now I feel like I missed out on something special.  The pattern is easy just some Yo's and ssk's.


This pattern was just not for me.  And that's okay.  You might have better luck knitting with this pattern.   I found the instructions to be unclear and unnatural for me.  I suggest to still give them a try and let me know how they worked for you!!!   The reviews on this pattern are mixed on Raverly.  Many people changed the top of the mittens because they had a hard time working with the pattern.  There are others that said they loved the pattern and it came easily to them.

The biggest thing I found was making the top of the mittens.  I felt that the part that covered the bottoms of the fingers was not enough space.  Plus this pattern doesn't have you knit down on the mitten, so the popup covers part of the actual mitten.  Once the popup part hit the mitten it stopped.  That causes fingers to pop out.  In my mitten, I picked up stitches and ribbed down for about 2 inches and then added a button so Chelsea could seal the flap shut.


She choose pink...good color;)

The seal would then not have any holes, unlike the original pattern.  This way part of the mitten and the popup part overlap, which lacked in the original pattern.


Since I didn't knit down enough...I still had one hole.  Chelsea had a pinkie that wouldn't stay in the mitten.  You can see in this picture that some of the flap that is supposed to cover up the mitten is sticking up.


Therefore, I had to have Chelsea wear the mittens and seal the hole shut.  It worked out very well.  Next time, I would make the ribbing part 3 inches instead of just two! Nevertheless, I was able to make them work for my dear old pal Chelsea.  She loved the mittens! She said they were very warm!


For those who are curious, I used Nashua Granite Yarn.  (Sorry Cascade, she wanted grey and this was in my stash!) The yarn worked up beautifully!

As always, happy knitting!

Em

Saturday, December 10, 2011

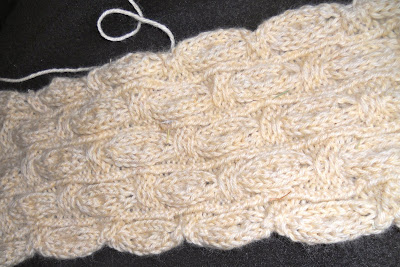
Pattern #12 Cables & Wraps Scarf

Hello Everybody it is Em!

I wanted to talk about the Cables & Wraps Scarf today!

This is a project that I started and restarted a few times. This was one of my first projects in the 60 Quick Knits Book. That's right...I started this particular scarf not in 2011 when we started our goal...but in 2009, way before Brittany had the book! (Actually, I have no idea if she had the book at this point.)

So why has it taken me this long to write about this pattern? Well, the reason is very simple. I have started and frogged this scarf quite a few times. First my yarn was too thin. I used a sport weight yarn and it was taking FOREVER. So I changed the yarn. Second time was my own darn fault. I didn't store my knitting in a good place and the project kept falling off the needle.

The third time I made the scarf, I found this particular pattern to be difficult. I worked on this scarf while I was on my housekeeping job, therefore I got distracted too easily. Plus, all of the rows are extremely similar, so I would start reading one row and then move to the next row.

So, now a year later, I frogged it AGAIN and used the proper worsted weight Cascade 220 yarn. I have been able to knit this scarf more than 2 inches ever since!


I purposely used a lighter color so everybody can see the complicated pattern. I feel if I am going to take this much time working on this pattern, then I must make sure that everybody can see it. I found a misfit skein of Cascade 220 Heathers sitting at my local yarn shop and decided it needed to be made into this awesome scarf.


The downside to finding this misfit yarn is that I realized that I am going to need 2 skeins of this yarn! I assumed that all the 60 Quick Knit projects that had only one color only took one skein... and you know what the old saying goes about assuming. So now I am on a quest to find more of this yarn! I also don't even know the original color of this yarn. It's a beautiful off-white heather tone. I am going to make an educated guess that the number of this yarn is 9600. I will have to figure that out soon! If I can't find it,  I might do a two-colored scarf like Brittany did for the Wave Scarf (Pattern #11)


As for errors... there seems to be one that I have found. This might not make complete sense unless you have the book in front of you. Bear with me please! On Row 3 you are increasing stitches to make the ovals. These ovals are a total of 7 stitches. In order to increase these stitches, you are supposed to knit into the next stitch. On Row 3 you currently have 5 stitches in the oval part of the scarf. You K2, K into the next stitch, K2. Row 4 has you knitting all 7 of those oval stitches... but according to my math teacher, the calculator, and my own pen and paper: 2+2+2=6 not 7. This means that we need to increase an extra stitch within the five original stitches.

In conclusion: it should be written like this
Row 3: P1, *k2, inc in next st, inc in next st, k1, p2, k1tbl, p2, sl 3wyif, p2, k1 tbl, p2: rep from *once more, end K2, inc in next st, inc in next st, k1, p1

Row 4: k1, p7....etc...

This scarf is a lot of fun to make. The pattern really isn't that complicated once you have done enough repeats. This scarf does take a while to finish, but it is worth the time put into it! I cannot wait to see mine finished!!! Hopefully I will overcome all the issues I'm having with finding the second ball of yarn to go with it!

Em

Friday, December 9, 2011

December 9 - Progress Update

As normal you will see an update of how many projects we have completed, started, or are still waiting to be started. If a project is still waiting it may have a name next to it. Some may not because a few of them we are going to decide on later. As in previous update posts if the project name is colored pink it is in progress by Brittany and if colored green it is in progress by Em. If the project name is colored and crossed out that means it is completed. We will also have Pattern Entries linked next to each project as we update the blog with our evaluations and input on each pattern.

As of December 8, 2011:
39/60 Projects - Completed
12/60 Projects - Works In Progess
9/60 Projects - Waiting to be Started


Pattern #1 Chain-Link Scarf- Project Entry = Coming Soon

Pattern #2 Cable Brim Tam - Project Entry

Pattern #3 Waffle Mittens - Project Entry

Pattern #4 Puppy Mittens - Project Entry = Coming Soon

Pattern #5 Tweed Watch Cap - Project Entry

Pattern #6 Tied Rectangle Wrap (Brittany)

Pattern #7 Embroidered Mittens - Project Entry = Coming Soon

Pattern #8 Lion Scarf

Pattern #9 Monkey Hat (Em)

Pattern #10 Diagonal Stripes Hat - Project Entry = Coming Soon

Pattern #11 Wave Scarf - Project Entry

Pattern #12 Cables & Wraps Scarf - In Progress Update Coming Soon!

Pattern #13 Ribbed Wristers - In Progress Project Entry

Pattern #14 Zigzag Scarf

Pattern #15 Striped Bobbled Hat (Brittany)

Pattern #16 Ribbed Bonnet

Pattern #17 Plaid Mittens - Project Entry

Pattern #18 Striped Graduated Scarf - Project Entry = Coming Soon

Pattern #19 Twisted Toque - Project Entry

Pattern #20 Textured Triple-Stripe Scarf (both)

Pattern #21 Birdcage Mittens

Pattern #22 Bobbles & Cables Cap - Project Entry

Pattern #23 Smocked Fingerless Mitts - Project Entry

Pattern #24 Mitered Scarf - Project Entry

Pattern #25 Ribbed Keyhole Scarf - Project Entry = Coming Soon

Pattern #26 Basketweave Scarf - Project Entry

Pattern #27 Scalloped-Edge Beanie - Project Entry

Pattern #28 Reverse Stockinette Mittens - Project Entry = Coming Soon

Pattern #29 Cupcake Hat

Pattern #30 Eyelet Scarf

Pattern #31 Garter-Ridged Hat (Brittany)

Pattern #32 Garter-Stitch Neck Wrap - Project Entry = Coming Soon

Pattern #33 Pocket Cap - Project Entry

Pattern #34 Checkered Mittens - Project Entry

Pattern #35 Textured Tam - Project Entry

Pattern #36 Leaf Scarf - Project Entry = Coming Soon

Pattern #37 Mock Cable Wristers - In Progress Project Entry Completed Project Entry

Pattern #38 Garter-Ridged Scarf - Project Entry = Coming Soon

Pattern #39 Cables & Stripes Mittens - Project Entry

Pattern #40 Tweed Mittens - Project Entry

Pattern #41 Pocket Scarf - Project Entry

Pattern #42 Ribbed Pillbox - Project Entry

Pattern #43 Octopus Mittens (Brittany)

Pattern #44 Tasseled Topper - Project Entry

Pattern #45 Bunny Mittens - Project Entry

Pattern #46 Leaf-Lace Gauntlets - In Progress Project Entry

Pattern #47 Striped & Ruffled Wrap (both)

Pattern #48 Starfish Hat - Project Entry

Pattern #49 Slip-Stitched Hat - Project Entry

Pattern #50 Ruffled Scarf - Project Entry = Coming Soon!

Pattern #51 Cabled-Cuff Mittens - In Progress Project Entry Completed Project Entry

Pattern #52 Cabled Scarf Hat - In Progress Project Entry Completed Project Entry

Pattern #53 Two-Color Slip-Stitched Hat - Project Entry

Pattern #54 Twisted-Rib Hat (Em)

Pattern #55 Triple-Cable Scarf (Em)

Pattern #56 Flip-Top Mittens - Project Entry = Coming Soon

Pattern #57 Drop-Stitch Neck Wrap

Pattern #58 Spotted Fair Isle Mittens

Pattern #59 Hugs & Kisses Mittens - In Progress Project Entry Completed Project Entry

Pattern #60 Scandinavian Mittens

Saturday, December 3, 2011

The Copper Llama


Hi everyone! It is Brittany. I have actually finished 2 projects from 60 Quick Knits yesterday. I also almost finished a whole extra project today! However, I am not going to talk about those projects just yet. Instead, I'm wanted to tell you about the great yarn shop Em and I visited today.


Em and I drove about 40 minutes from my apartment this morning to get some amazing Cascade yarns. Our friend Zoe had told us about this yarn shop that had a variety of Cascade yarns. Em and I had talked about going there for a while, but we never did. When a Ravelry knit-a-long for the Cabled Ski Cap (60 More Quick Knits) came along I needed some Cascade Sports Weight. The Copper Llama seemed the perfect place to go.


The Copper Llama is a beautiful yarn shop with a wide variety of Cascade 220 yarn. They do not exclusively sell Cascade, but they had brands of Cascade neither Em or myself had ever heard of. Not only was it great to see all the colors and kinds, but the yarn shop itself was so unique. It is attached a little farm where you can see llamas. The yarn shop has a log cabin feeling and the owner was wonderful. She offered us tea almost the second we got there and she even put up with us talking about teaching.

Em and I definitely had a lot of fun shopping there and you can look forward to future posts about the projects we created with out new yarn! :)

Hope you all have a great day!
Brittany

Saturday, November 26, 2011

November 26 Progress Update

It has been a very long time since we last updated our numbers on knitting. We have not been knitting quite as quickly and fervently as we were before. However, we are still making some progress. Here are the latest totals.

As normal you will see an update of how many projects we have completed, started, or are still waiting to be started. If a project is still waiting it may have a name next to it. Some may not because a few of them we are going to decide on later. As in previous update posts if the project name is colored pink it is in progress by Brittany and if colored green it is in progress by Em. If the project name is colored and crossed out that means it is completed. We will also have Pattern Entries linked next to each project as we update the blog with our evaluations and input on each pattern.

Our original goal, as many of you know, was to have the whole book completed in time for the New Year. However, with only a month to go and another 23 projects to complete, we do not think this will be a reality. Instead we are hoping to have 5 more projects completed by the end of December. This will leave us with just 18 projects to finish in 2012. Now, taking into account that most of the projects we have left are scarves, our new goal will be to finish by June 2012. Though the book is called 60 Quick Knits it is very rare to have quick knit scarf of any kind. We still have about 8 of them left to do! Yikes! Happy knitting! :) Brittany & Em

As of November 26, 2011:
37/60 Projects - Completed
11/60 Projects - Works In Progess
12/60 Projects - Waiting to be Started


Pattern #1 Chain-Link Scarf

Pattern #2 Cable Brim Tam - Project Entry

Pattern #3 Waffle Mittens - Project Entry

Pattern #4 Puppy Mittens - Project Entry = Coming Soon

Pattern #5 Tweed Watch Cap - Project Entry

Pattern #6 Tied Rectangle Wrap

Pattern #7 Embroidered Mittens - Project Entry = Coming Soon

Pattern #8 Lion Scarf

Pattern #9 Monkey Hat (Em)

Pattern #10 Diagonal Stripes Hat - Project Entry = Coming Soon

Pattern #11 Wave Scarf - Project Entry

Pattern #12 Cables & Wraps Scarf

Pattern #13 Ribbed Wristers - In Progress Project Entry

Pattern #14 Zigzag Scarf

Pattern #15 Striped Bobbled Hat (Brittany)

Pattern #16 Ribbed Bonnet (Em)

Pattern #17 Plaid Mittens - Project Entry

Pattern #18 Striped Graduated Scarf - Project Entry = Coming Soon

Pattern #19 Twisted Toque - Project Entry

Pattern #20 Textured Triple-Stripe Scarf (both)

Pattern #21 Birdcage Mittens

Pattern #22 Bobbles & Cables Cap - Project Entry

Pattern #23 Smocked Fingerless Mitts - Project Entry

Pattern #24 Mitered Scarf - Project Entry

Pattern #25 Ribbed Keyhole Scarf - Project Entry = Coming Soon

Pattern #26 Basketweave Scarf - Project Entry

Pattern #27 Scalloped-Edge Beanie - Project Entry

Pattern #28 Reverse Stockinette Mittens - Project Entry = Coming Soon

Pattern #29 Cupcake Hat (Brittany)

Pattern #30 Eyelet Scarf

Pattern #31 Garter-Ridged Hat (Brittany)

Pattern #32 Garter-Stitch Neck Wrap - Project Entry = Coming Soon

Pattern #33 Pocket Cap - Project Entry

Pattern #34 Checkered Mittens - Project Entry

Pattern #35 Textured Tam - Project Entry

Pattern #36 Leaf Scarf - Project Entry = Coming Soon

Pattern #37 Mock Cable Wristers - In Progress Project Entry Completed Project Entry

Pattern #38 Garter-Ridged Scarf - Project Entry = Coming Soon

Pattern #39 Cables & Stripes Mittens - Project Entry

Pattern #40 Tweed Mittens - Project Entry

Pattern #41 Pocket Scarf - Project Entry

Pattern #42 Ribbed Pillbox - Project Entry

Pattern #43 Octopus Mittens (Brittany)

Pattern #44 Tasseled Topper - Project Entry

Pattern #45 Bunny Mittens - Project Entry

Pattern #46 Leaf-Lace Gauntlets - In Progress Project Entry

Pattern #47 Striped & Ruffled Wrap (both)

Pattern #48 Starfish Hat - Project Entry

Pattern #49 Slip-Stitched Hat - Project Entry

Pattern #50 Ruffled Scarf

Pattern #51 Cabled-Cuff Mittens - In Progress Project Entry Completed Project Entry

Pattern #52 Cabled Scarf Hat - In Progress Project Entry Completed Project Entry

Pattern #53 Two-Color Slip-Stitched Hat - Project Entry

Pattern #54 Twisted-Rib Hat (Em)

Pattern #55 Triple-Cable Scarf

Pattern #56 Flip-Top Mittens - Project Entry = Coming Soon

Pattern #57 Drop-Stitch Neck Wrap

Pattern #58 Spotted Fair Isle Mittens

Pattern #59 Hugs & Kisses Mittens - In Progress Project Entry Completed Project Entry

Pattern #60 Scandinavian Mittens

Thursday, November 17, 2011

Pattern #19 Twisted Toque

Good Day Everybody, Em is here!!

Today I write to you about my very first knitting project from this book...the Twisted Toque.


That's right, this is the pattern that got Brittany to fall in love with the book and purchase it.  (I got it from falling in love with the book from my friend Donna.)

I made the first version of this hat in 2009 (way back in the day when Brittany and I shared a room at Saint Norbert College) for the Green Bay Girl Choir.   When I made the hat then, I had to restart it twice because I had a hard time getting the pattern to twist.  Once I was able to, I knit the hat in less than 24 hours.  However, I didn't take any photos of the ha.  I have no idea why.  The hat has been donated and I have not been able to track down the person who has the hat.  But let me tell you, that hat was pretty awesome.  I used Lion Brand yarn to make the hat.  Since the hat was for kids, I wanted a simple durable yarn.

Well, a few of us on the 60 Quick Knits site decided to do a knit along.  The results were awesome...we all managed to get our hat to twist!


Here is what I think the secret is to the twisting...the M1!  I know a few times I forgot to make that stitch, and in result, the pattern would not shift to the side.  The stitches in this hat fall into place very easily.  You knit or purl what you see and then make one at the end of the 12 stitch repeat.   I promise you, if you do the M1 your pattern will twist!   It will take a few rounds (and when I mean few I mean about 10 or so) before you can see the actual twist.


One of the knitters that made the project in the KAL said that she did not knit the full length.  This was because she did not want the hat to become "too slouchy."  This makes sense, especially if one is a looser knitter.   I did the same thing: my hat has a 3 inch brim and a 5 inch pattern before the decrease.

Another knitter stated she did not care for the hat because it was "too pointy."  (You can see that pointy-ness in the photo below)


The decreasing on the top of the hat is more slanted than other hats in the 60 Quick Knits.  Many of the other hats have a k round between decreases.  However, this one just decreased from 96 sts to 8 sts in a matter of 13 rounds.  This may seem like a lot, but I have made other hats that had twice as long to decrease the same number of stitches (aka. the Tasseled Topper hat).

There are no errors in this pattern.  It is a great, simple, fun knit that everybody should try!


I used Misti Alpaca for this project, sorry Cascade...I was craving orange alpaca!

E

Sunday, November 13, 2011

Pattern #44 Tasseled Topper

Hey Everybody it is Em!!!

I am pleased to announce that I have finished the Tasseled Topper...pattern #44 in the 60 Quick Knits Book! I am making this hat for my grandma!


I knitted this hat with a size 8 (then a size 9 because my needle broke). I used Cascade Eco+ to make the hat.


This knit was a fast knit...it only took me three days to make. What I found interesting was the pattern itself. There is a cable in the middle of the hat. However, after a few rows, we stop making the cable and start knitting and purling instead. The knitting and purling combination made the hat "stumpier" so I added about 15 extra rounds to the hat. Many people on Rav said that the hat was way too short.


I found my hat to be way too "spacy." I cannot stand how some of the hats in this book are A/too short and B/too loose. They don't feel comfortable and therefore end up in the bottom part of my closet. This hat is very loose, but it covers the ears. It will also be perfect for my grandma because she likes her hair to have space underneath her hat.


The cable was not what I expected. The back of the cable looks cooler than the actual cable. I thought that it was strange to do it that way. Since the cable was only knit with 22 rounds you only cable twice.
At first, I thought I was messing up the cabled pattern. It just did not look right and the photo did not help me. The photo is taken at a strange angle, which makes it difficult to know if I'm doing it right or not. I ended up looking at pictures on Ravelry and then decided I was doing it right.

There were no errors in the pattern...at least none that I found.


That's all for now!!!! I'm working on a few more patterns from 60 Quick Knits...I hope to post more very soon!

Em

Wednesday, October 19, 2011

Pattern #2 Cabled Brim Tam

Pattern #2 - Cabled Brim Tam

Hello friends! This is Brittany, and it has been much too long...

First, I apologize to all of our readers. I realize there has been a serious lack of posts. During the school year, I tend to get pushed in several different directions and suddenly months just slip by. (December tends to be the worst for Music Teachers, just as a fair warning ;))

Anyways, today I'm going to tell you all about the Cabled Brim Tam. I started and finished this hat several months ago (around July). This pattern was very quick and exciting to knit. I have to admit I was a bit nervous about this pattern at first. Em is really good at cabling, but I have only cabled a few times. The first time I did alright, but when I tried a cabling project on my own I became all confused and my project turned out like a mess! However, I had a friend who wanted this hat and so I figured, why not at least give it a shot!

Here is the result:
Pattern #2 - Cabled Brim Tam

After making the hat, one of my knitting friends, Zoe (pictured below, doesn't she look great in this hat?), commented on how much she liked the hat. She was then very surprised by her own green cabled brim tam made especially for her just a few weeks later.

Zoe in the Cable Brimmed Tam

So now what you really want to know, what was difficult about the project and what should you know if you make it:

First, I had to start this project over about two or three times at first. That is because I was reading the chart incorrectly. A lot of the patterns in this book are written so that all the purl stitches are - signs and all the knit stitches are blank. However, in this pattern you need to keep track of if you are on the right side or the wrong side. If you are on the right side the stitches are different than the wrong side. I got the hang of this after a while, but if this becomes too difficult I would suggest writing it out for yourself. (Notes made by YOU are normally the easiest to read, we all think a little differently)

One other thing, I noticed that I started to run out of yarn for this project. The project calls for one skein, but I almost had to use two on both hats I made. I also cut out several rows from the pattern when I made this. I realized that the hat was slouchy enough without these rows. You can look at the results and decide for yourself if you like the results or would want a slouchier hat. Here is what I did (and it only used one skein with a tiny bit of yarn left over):

Kept the pattern as is until rnd 34
Skip rnds 35 & 36
Skip rnds 37-44
Follow instructions for Rnd 45 & 46
Skip rows 47-50
Follow instructions for rnd 51-55

So, as you can see I did skip a LOT of rows. It saves some work and still gets a pleasing finished product.

Pattern #2 - Cabled Brim Tam

Yarn Information: Cascade 220 - #8401 (silver grey)

That is all for now. As always you are welcome to view more pictures at my Flickr account,
Brittany


Friday, September 16, 2011

Pattern #41 The Pocket Scarf

Hello Bloggers,

This is Em.  School is underway.  Right now I am in my 3rd week of school.  Things are not too crazy yet.  I've been doing a lot of non 60-Quick Knit knitting right now.  That's because I am trying to finish all the baby garments I am making for gifts and what not.  Brittany is having a ball teaching, she is at two different school districts teachigh music, as her school year(s) are underway as well!  From what I have seen on her profile, things are going very well for her.

 Today I am writing about one of my first scarves from this book: The Pocket Scarf!


While I was pre-student teaching, I was in a carpool, to help calm my nerves, I worked on the knitted Pocket Scarf.  This is a very quick knit.  I didn't have a lot of problems with it...except by the time I got going on it, I had to put it away and go teach 4th/5th graders! 

I made this scarf in a total of 5 weeks.  (Remember, I only worked on it for maybe 20 minutes a day.) The pattern is very simple and it's a great: I'm knitting for the sake of knitting kind of night.  You know, the ones where you don't want to think too hard...


Making the pockets was something else.  I ran out of yarn! That's why you will notice on my scarf there are two different colors.  You will need more than one skein, of each color, in order to finish up this project.  I sadly couldn't find the other color, so I got one that was similar.


I purchased the buttons at a LYS; I chose wooden buttons because I thought it would make a great earthy look.


I was asked several times if I blocked this scarf.  No, I don't block scarves.  That's because they hang all weird on your body regardless of what you do.  However, since the edges tend to roll in, I might consider blocking it in the future.  We'll see ;)
According to the Cascade Errata Website, there is an error in the pattern:

1. Row 1 of Pockets is incorrect, it should read as follows:
POCKETS (make 2)
With A…..as foll:
Row 1 (WS) K7, p16, k7.
Continue as written to FINISHING.

2. FINISHING
After blocking, position WS of pocket A to WS of pocket lining section B (RS of Scarf) as directed.
Using A (same color as pocket), tack each corner of pocket to scarf.
Continue as written.

I did not find this error when I was knitting it...but I also think I didn't exactly read the pattern when making the button holes.

The yarn used for this project was the yarn that the pattern originally asked for. (As well as my mystery yarn that I never figured out the name of...)

That's all for now...Happy Knitting!

Em

Thursday, September 1, 2011

Em and Brittany - Stitches Midwest 2011!


Hello Blog Followers,

Last week, Brittany and I had the opportunity to attend Stitches Midwest! This was my second Midwest Stitches (3rd Stitches overall) and Brittany's first Stitches. Although this blog is dedicated to our work in 60 Quick Knits, I figured it would also be fun to write about our adventure to the biggest yarn convention in the Midwest.

We had a lot of fun, but we also worked hard. Since Brittany and I both work for Interlacements, we spent a lot of time selling Interlacements Yarn in their booth.


I gave plenty of beaded scarf demonstrations, and Brittany helped everybody pick out colors and directed them to the sale yarn.

At the end of the day, our feet were sore from walking and our faces were tired from all the talking we did. It was worth the effort, as we got to meet a lot of wonderful people this weekend.

However, just because we sell for one yarn company, does not mean we will pass up the opportunity to purchase from other yarn companies. We picked up lots of yarn goodies including a few hat patterns we were eying up from the Halos for Hope booth.

Brittany got to meet Shannon, one of our favorite Cascade people! We also got to meet Michael, another Cascade person.


We even got a snap shot with the Cascade sheep (who has yet to be named).


And a sneak peak at the brand new 60 Quick Knits


WE ARE EXCITED! I, of course, wanted my copy as as possible, but Brittany told me I have to be patient. It's full of great patterns and picks up where the original 60 Quick Knits left off with plenty of mittens, gloves, scarves and more!!! Brittany and I fell in love with the book... maybe a new blog for Brittany and I will be brewing in the future...? Who knows!

Happy Knitting! More in regards to our 60 Quick Knits Adventures to follow very shortly!!


Em

Tuesday, August 23, 2011

Brittany and Em Interview

Hey everybody!

Brittany and I had the brilliant idea to meet some of our viewers via blogger.  Our friend Meredith conducted a little short interview for us so everybody could get a chance to meet us!  Here is the video!!!!


In our video we talk about how we met, how we got started with knitting and how we started the 60 Quick Knits project.  Pardon our horrible humor:)

Brittany and I are also heading to Stitches Midwest this weekend!!  (Brittany will be there Thursday, I will be there at a later time) Please come say hi to us at the Interlacements booth!!!!!!  We love to make new friends!!!


Talk to you soon!
Em and Brittany

Wednesday, August 17, 2011

Pattern #33 Pocket Cap

Hey Everybody it is Em!!!


This week I am writing about the Pocket Cap. 

This is a very quick knit.  I made it in one afternoon.   This is even the bigger size.  Although I am quite curious who would be able to fit in the smaller hat.  I gave this hat to my cousin's new 6 week old baby girl.  This hat fits her perfectly.  I am normally a "right on target" knitter.  I have always been lucky with gauge (rarely check it anymore). 

This hat is perfect for little kids.  They will be intrigued by the pocket and still be kept warm. 


The only "difficult" part of this hat is making the pocket.  I would make that first.  Keep it on a double pointed needle and be ready to add when the time comes.

The only complaint I have about this hat is the pocket of the cap tends to stick out.  Maybe using a bigger button might make a difference.  I used three hot pink beads to make my button.  It didn't work as well as it could have...


When it is time to add it, just line up the stitches and knit one stitch from your circular and one stitch from your double point together.  

I used Cascade 220 Heathers 2452 Turtle for the MC  I used Dark Horse Fantasy for the CC.


Happy Knitting! See you soon!
Em

Friday, August 5, 2011

Pattern #46 Leaf-Lace Gauntlets

Hello everybody it is Em!

I wanted to write to you all about a very special pair of mittens. These mittens mean the world to me. Why? Because it took me not once, not twice, not even three times, but FOUR times to get these to look correct!

They are pattern #46...the Leaf-Lace Gauntlets!!!!


The Leaf-Lace Gauntlets' description reads:

"These elegant, lacy wristers make a strong, fashion statement. They're knit back and forth in an intricate lace pattern that will entice and challenge even the experienced knitter." 


I normally do not pay attention to the description.  Not that I don't care, but I have found descriptions to be "biased."  The truth always comes to light with the pattern: how it is written is so much more important than what the author says it is.   I also have a nice picture to look at, which to me, tells me much more than the description any day.  And if I cannot find a picture, I don't knit it.  However, this description nails these mittens perfectly. (I mean wristers!). These mittens were probably the hardest mittens/wristers (whatever you want to call them) that I have ever made.  Like I said earlier, I had to start them over several times before I finally got them to look some-what correct.   


They are complicated but do-able!  If I can do them...so can you!!!!! I believe in you!!!!!  


The first four times my biggest mistake was I didn't have the correct mental space to do the work.  What I mean by "mental space" is I didn't have my mind in the right place. 


You can't take this project out social knitting.  This is something you have to really, really focus on.  I would get lost all the time working on this project.  Even the TV distracted me.  Since my family loves the TV turned way up loud, it was really hard to find time to work on this project. 

The best way I could keep track was zeroing in on where I was knitting in the row. I would put post-it notes (a knitter's best friend) above and below the row I was knitting on.  (Ignore my scribbles on my post-it notes, I like to reuse old ones.  The drawings are my co-worker's thumb sizes for their mittens.  That way they are custom fit!)


I would take a third post-it note and put it over the majority of the row.  I would only leave about 5 stitches uncovered.  That way I could focus on those stitches and make sure I got them right.  Then when I got to that point, I would move the post-it note over.  I always ended on the same type of stitch.  For example, I always ended on a yo.  That way I remembered where I was when I moved the post-it note.  I also used stitch markers.  I had a stitch marker 1/2 way though the project, that way, if I got to the half way point and I still had several to go before I hit my stitch marker, then I did something wrong and had to go back. 


I also had markers two stitches before the end on each side (since those last two stitches were for the edging anyways).

The good news about this pattern is, once you get going it makes sense.  You don't feel as if you are making yo's or k2togs blindly.

I used the sample color, Cascade 220 Wool Heathers #2452 Turtle.


Again, if I can knit them....so can you!!!!!!!!

Best of luck!

Em